This image is honored as Wikipdia Picture of the Day 28 July 2009 (Best of 3) Sea Otter (Enhydra lutris) mother with nursing pup in the Morro Bay harbor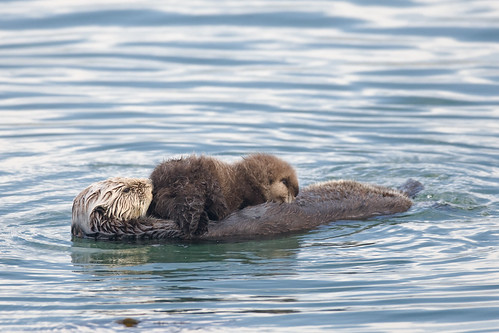
Image by mikebaird
This image is honored as Wikipdia Picture of the Day 28 July 2009
Do you want to use one of my images?
(Best of 3) Sea Otter (Enhydra lutris) mother with nursing pup in the Morro Bay harbor, Morro Bay, CA. 27 Oct. 2008. Michael "Mike" L. Baird, Canon 1D Mark III, 600mm f/4 IS with circular polarizer, on tripod.
17 July 2009 Creative Commons use note
24 July 2009: Self-promotion - (and NEW RELATED CLASS - see below) - I was honored to get one of my sea otter with pup images www.flickr.com/photos/mikebaird/2979351573/ be selected as Wikipedia Picture of the Day for 28 July 2009 as seen at en.wikipedia.org/wiki/Template:POTD/2009-07-28
Six of my sea otter images are used on the Wikipedia Sea Otter definition page at en.wikipedia.org/wiki/Sea_otter
en.wikipedia.org/wiki/File:Sea_otter_nursing02.jpg
en.wikipedia.org/wiki/File:Sea-otter-morro-bay_13.jpg
en.wikipedia.org/wiki/File:Sea-otter-bay_11.jpg
en.wikipedia.org/wiki/File:Sea_otter_with_injured_nose.JPG
en.wikipedia.org/wiki/File:Four_sea_otters.JPG
en.wikipedia.org/wiki/File:Sea_otter_cropped.jpg
Related to this placement is the fact that I will be giving a class on how to popularize your images at Flickr and Wikipedia and Wikimedia at the Morro Photo Expo morrophoto.com/ on Sat. Oct. 24, 2009 2:00 - 3:30PM.
This class was just recently added because registrations are exceeding expectations - if you have already signed up for the expo morrophoto.com/schedule.shtml and want to attend this class morrophoto.com/a-flickr.shtml you can contact Dawn Beattie Dawn_Beattie[@}charter.net and ask to be added).
Flickr: A Radical New Social Networking Paradigm for Photo Sharing with Mike Baird
Why share? "A photo taken but not shared might just as well have never been taken." Learning from others. Giving versus getting in a social networking context. Preserving your Intellectual Property rights (IP), copyrights. Creative Commons licensing. Getting your photos recognized, featured, popularized. Understanding the proprietary Flickr measure of "Interestingness." Using Groups and Pools. Getting and giving critique. Netiquette - how to be a good Flickr citizen. Cloud computing trend: processing, storing, and distributing your digital photos entirely online and independent of any personal computer. Photographer's rights to take and use photos. Perpetual image hosting - Flickr promises to never erase an image! What does that mean in terms of your legacy?
Photographer Michael "Mike" L. Baird is an avid and some say addicted Flickr user, having migrated most of his Internet photo presentation sites (bairdphotos.com, stealthispicture.com, digitalchocolate.org, BirdsOfMorroBay.com...) onto Flickr, which you can find via flickr.bairdphotos.com. Mike wants to infect you with his same interest. At Flickr, Mike hosts about 5000 Morro Bay-related images which have been viewed over two million times, averaging 4000 views a day. His "most interesting" images have each garnered 20,000 views and 400 comments, and appear in 60 groups, and some are linked to or purposed with attribution from up to 200 different external sites. Because of Flickr and the related Creative Commons revolution, hundreds of his images have now been used in educational settings including State Park, National Marine Sanctuary, National Estuary Program, etc. kiosks and displays, books, pamphlets, interpretive signs, rescue cards, Coast Guard murals, birding resource sites, etc.
In this presentation Mike hopes to get you excited about the possibility of projecting your photography further into the digital universe. Many of us do not realize it, but our legacy may well be represented by only those bits we leave behind on the Internet. In 500 years, what will Google and Flickr say about you?
Used in this Mother Jones article
m.motherjones.com/blue-marble/2012/02/how-exxon-valdez-oi...
OrigamiPod : Let's start!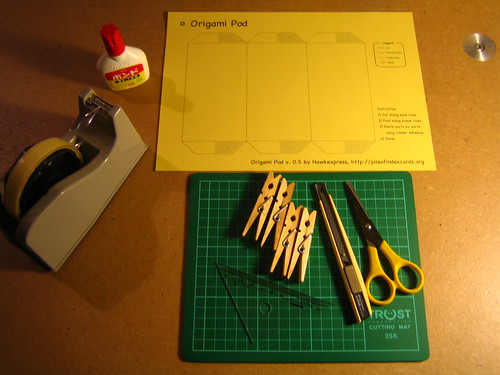
Image by hawkexpress
Origami (折り紙) means a folding paper in Japanese. And a pod is an 5x3 index card holder that plays a keyrole in the PoIC system. Let's make it by ourselves :)
Print the template on 3 sheets of A4 size paper. A paper should not be too thin or too thick. Find appropriate paper that bears open-close action of the accordion.
# I found a paper I use here was still thin. Choose thicker paper like this when you try. ;)
Ref . : @blog, OrigamiPod : icPod for everyone
News! : The OrigamiPod is Introduced on www.lifehack.org/articles/productivity/paper-accordion-or... :))
Day 41: The Metro Art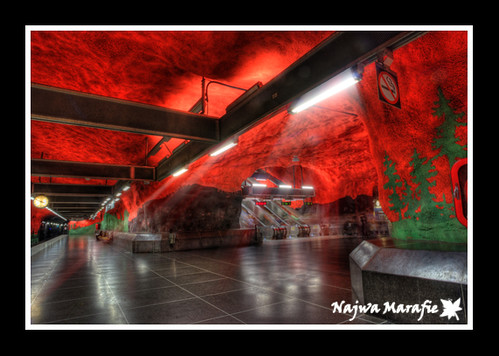
Image by Najwa Marafie - Free Photographer
Stockholm Public Transport - SL
Transportation in Stockholm is efficient, convenient and safe. Moreover, Stockholmers protect their beautiful environment. As a result, many of the downtown buses run on environmentally friendly fuels such as ethanol. Stockholm Public Transport, SL, runs the buses, subway, commuter trains, trams and some of the ferry lines in Stockholm county.
Travelling by the Stockholm subway system is the easiest way to get around town. The Stockholm subway is also called the longest art exhibit in the world, since many of the stations are richly adorned by various artists.
Stockholm is divided into three zones, and the zone tickets are valid for multiple trips within one hour. Tickets can be purchased at the SL Center, subway turnstile booths, Pressbyrå shops, ticket machines or by SMS. You can’t pay cash for tickets on the buses in Stockholm. Most bus stops have ticket machines that accept both coins and cards.
A punch ticket is the best choice if you’re not making many trips. Buying a 1- 3- or 7-day card is also a good solution. These give you free travel in all zones during their validity period. Another alternative is the Stockholm card, which gives you free travel and free admission to 75 museums and attractions in the city. The card comes in 24-, 48- and 72-hour denominations.
A marvelous way to discover Stockholm is to take buses number 47 and 69. Number 47 goes out to Djurgården, with attractions such as Skansen and the Vasa Museum, and number 69 goes out to Gärdet, where Kaknästornet (the Kaknäs tower) is located.
You can also take Stockholm public transportation in to downtown from Arlanda and Bromma airports. Bus number 583 runs from Arlanda to Märsta, where you pick up the subway to downtown. Bus number 110 runs from Bromma airport to Alvik, where it’s easy to take the subway in to the city.
Guided tours of the Metro art
Guided tours of the Metro art from June 16
[2009-05-29] With its 90 stations adorned with art, sculptures and installations, the Stockholm’s Metro is said to be the longest art exhibition in the world.
Between June 16 and August 29 guided tours of the Metro art take place every Tuesday, Thursday and Saturday at 3 pm.
Tuesdays: Art and architecture of the Blue line
Starting from SL Travel Centre at Fridhemsplan
Thursdays: Art and architecture of the Green line
Starting from SL Travel Centre at the Sergels torg exit, T-Centralen
Saturdays: Art and architecture of the Red line
Starting from SL Travel Centre at the Sergels torg exit, T-Centralen
All you need to join in is a valid ticket to travel.
Would you like to sneak a peak? Check out the artguide in the Art and architecture section.
Location: Solna Station - Stockholm - Sweden
Copyright Reserved 2009 ©
Mobile: +965 66 383 666
e-mail: N_Studio@live.com
-----------------------------------------------
Gear: FUJIFILM FinePix S5Pro
Exposure Time: HDR
F-Number: 11
Focal Length: 14 mm
Lens: Nikon 14 mm - f/2.8
ISO: 100
Exposure Program: Manual
Tripod: Yes
Rate my photo: 1 2 3 4 5 6 7 8 9 10
DIY Desktop Studio AKA Foamboard Box and Masking Tape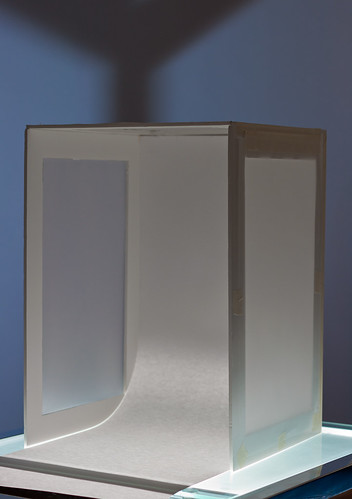
Image by Sprogz
I've wanted a desktop "enclosure" to take macros and suchlike whilst isolating the background clutter that also occupies my desktop for quite some time now.
Today, 05 Jan 2011 I finally constructed one.
I took inspiration from this classic article strobist.blogspot.com/2006/07/how-to-diy-10-macro-photo-s... but instead of cardboard (had real trouble finding a reasonable-sized cardboard box, got impatient and used foamboard).
I purchased all the bits from a local Hobbycraft store.
A3 5-sheet pack of white foamboard, £11.99. Could have saved myself this if I'd found the right-sized cardboard box. Oh well, I'll make a larger one when I find the right-sized cardboard box.
A1 sheet of 90g tracing paper, £1.58.
Several pieces of A1 150gsm coloured card; white, black, green, blue and red. £1.99 each.
Finally, a roll of masking tape that I had laying around the house.
I marked a 35mm-ish border around two A3 pieces of foamboard, cut out the middle inside this border with a Stanley knife (be careful) and stuck them to a third piece (the back) which I did not cut a hole in using masking tape.
I placed another A3 piece of foamboard across the top, marked where it needed cutting to fit snugly on top and then cut it. I then marked the same 35mm border around the edge of this now squarish piece and again cut out the middle. I then stuck it on top with masking tape.
I used the pieces of foamboard I cut out as templates on the big A1 sheet of tracing paper adding about 15mm overlap and simply cut out the tracing paper with scissors. I then stuck them over the holes in the sides and top with masking tape - that way I can remove them if I want to shoot directly into the box from the side.
I cut a strip of white 150gsm card the same width as the box, laid the box on its back, placed the card on the back right up to the top and then simply stood the box up. The card just bent seamlessly at the back as you can see in the photo.
I cut a black piece of card too. This is the first shot I took with the black card backdrop firing a Canon 430 EX II through the left-hand "window" and a reflector (actually the unused fifth piece of white foamboard) inside the box on the right-hand side.
www.flickr.com/photos/sprogz/5328342164/
I kept the bottom of the box uncovered so I could place it over the top of things outside when the weather's better. You can still place it on the unused fifth piece of foamboard to temporarily create a base if you really want to.
Plus, all the off-cuts of white foamboard can be used as reflectors, gobos or whatever.
Apologies that this shot is more "arty" and less about the construction details. I'm sorry, I just can't help myself.
O.o
No comments:
Post a Comment